I would like to enter my card into the following challenges -
Frilly and Funkie Challenge Blog - For Our Father's
Country View Crafts Challenge Blog - Only Men Allowed
Simon Says Monday Challenge Blog - Anything Goes
Try it on a Tuesday Challenge Blog - One For The Boys
Crafty Catz Challenge Blog - Two Different Dies (weathered clock, pocket watch, feather/inkwell
OLLCB Challenge Blog - Father's Day/Male
Totally Gorjuss Challenge Blog - Dads
My supposed to be brown with no blue!!! Father's Day card.
But I have to admit the end result with the blue/green is my favourite one I have
ever done, sometimes you think it goes all wrong, but it went all right in the end.
One thing I learned, definitely do a test and always don't give up even if
you have to change plans :-)

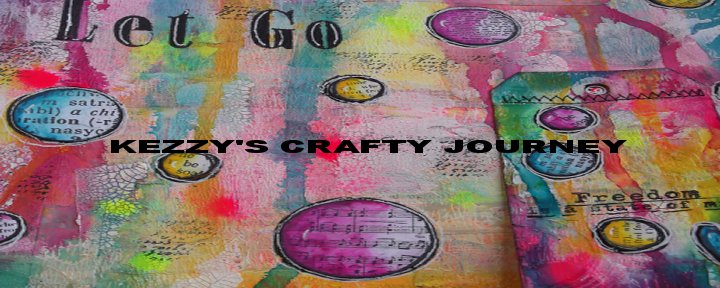
Lots of close ups, followed by the step by step (grab that cuppa) lol


With matching box (the box post here)

And now for the step by step (that's if you haven't got mega bored yet lol)
I got the box that I made last weekend and messed about with the layout I wanted,
including die cuts and stamps (didn't use that stamp in the end lol).
Now at this point, it is important to see that the pocket watch and the little ink pot is
cut from thick chipboard that has already been painted. It had the same paint Fresco from Paperartsy
but was done when I was just starting with paints so around two years ago.

I started with some Paperartsy smoothy card that was larger then my main layer above,
and used Mr Holtz's mask dot fade Paperartsy grunge paste.

Next I started to work on my main panel using watercolour card.
I swished Distress ink pads pumice stone, iced spruce and frayed burlap on my
heat proof mat and added water then dragged my card through it, dried and then did it again,
and again, and again (you get the idea lol).

I didn't feel like it was a close enough colour to the box so I added some Paperartsy Fresco paints
taupe onto my mat with lots of water, then I used a small bit of french roast
in the corner and dragged through the watered down taupe, then dipped my main
panel into it in areas.

Then I flicked the whole thing with water, gorgeous distress with the opaque of the
paint in areas but still getting the water flicking with the distress, Magnificent!!!

I covered all my die cuts (recipe at the end of what I used) with
Fresco paint stone.

The pocket watch I wanted exactly the same as the box, so after the stone I
dry brushed Taupe over the stone ............

then mud splat ........

Then french roast (you have to see further on what happened, wait for it!!!!) lol lol

I didn't use this in the end as I didn't like the look with the new colours, but
I did the same on the back of the pocket watch as the main panel.

Doesn't it look nice, all matched up to the box, I was so extra pleased with myself.
(hmmmmmmm it's coming!!!!)

The rest of the die cuts (apart from the feather) we swished through Distress Paint
antiqued bronze and a bit of Fresco french roast and sprayed with water.

It gave such a lovely effect (still rather please with myself)

The Alpha parts where painted with one layer of Fresco french roast, then
when dried I swiped the Distress paint antiqued bronze over it, dried a little,
then rubbed off.

The feather was swooshed through some Distress paint pumice stone and iced spruce
then swished through some frayed burlap (all this swishing and swooshing lol)

I got everything together, added a dark piece of card stock underneath to have
a look, oh wow I was jumping for joy. I also painted
the insides of the Trellis die from the box with Fresco french roast.
Also the grunge paste background was added with the same dry brush
technique as the pocket watch was.
Before I went off to do some jobs I added
Decoart one step crackle over some of the die cuts ............

Oh bugger bugger bugger, the blue paint from two years ago has been drawn up
with the crackle, I have now got Blue eeeeeeek!!!!!!

Very very blue, not dark but bright blue!!!! I went calmly away for awhile and
thought maybe it will disappear when everything was cracked hmmmmmmmm

It's now blue green, and everything else is brown and it sticks out a mile grrrrr,
at this point, Saturday afternoon, the day before Father's Day I went downstairs and
had a cuppa and a biscuit or two and seriously was thinking of nipping to the shop to buy a card!!!

Nope I wasn't going to be beat .....................
If it wanted to be blue/green, then blue/green it will be lol

I left that for a bit while having a think and went back to making up the card.
I added some Treasure Gold to the bumps of the grunge paste and edges.

Nope the pocket watch was still blue/green, I kept hoping it would turn back to brown,
oh and now the little ink pot was turning blue. Thank goodness non of the rest was die
cut from the blue painted chipboard Phew :-)

I painted a Calico Crafts laser cut mdf with French roast and used treasure
gold around the edges and added the DAD.
(had a quick peep at the pocket watch and it still was blue/green)

And then I added treasure gold all over the edges of the ink pot and feather,
because the ink pot was coloured with antiqued bronze and french roast the blue
was really quite a dark green.

No way did I have time to re do it all so I covered the pocket watch with french
roast and kept wiping away with a dry wipe and added treasure gold around the edges.

I used a script stamp and embossed with copper, then edged with treasure gold.

So back to the main panel, I really had to get some blue/green colour somewhere,
so I added on top of the already done effect using frayed burlap, Fresco french roast,
walnut stain and swiping through bits of South Pacific.

Ok so that looked better, and even flicking with water worked.
Oh how I love the Fresco Paint/Distress Ink look :-)
I did in the end added a bit of Fresco stone and taupe with lots of water to brighten
the middle a bit.

I decided again the earlier backing and this time went for a college effect rather then
colouring in effect as it was getting late lol. I did go over him with a waterbrush and
distress pumice stone and edged with distress as well.

I stencilled some harlequin with French roast, then stamped swirls with
archival potting soil and added embossed script as well.

Before adding it all together I printed out a nice verse for my Daddy who I love very much :-)

Right better be off, I bet your glad it's finished lol. Hope you enjoyed and feel free to ask about any technique you would love to see in more detail.
Happy Crafting
Hugs Kezzy xxxxx
Recipe
Paperartsy - Fresco paints - french roast, taupe, mud splat, stone, south pacific
Distress paint - pumice stone, iced spruce
Distress ink pads - walnut stain, gathered twigs, iced spruce, frayed burlap, pumice stone
Stencils - Tim Holtz - dot fade and harlequin
Tim Holtz Alphaparts sign maker
Stamps - Paperartsy (man of numbers plate 5), Creative Expressions (textures), Indigo Blu (vintage flourish),
Stampers Anonymous (numbers)
Paperartsy grunge paste and smooth card
Sizzix Alterations - mini feather and inkwell, circles, pocket watch, weathered clock, trellis
Calico Crafts - wood mini plaque
Archival potting soil
Versamark
Copper embossing powder
Treasure Gold copper
Decoart one step crackle.
19 comments:
What an an absolutely lovely card and step by step! Thanks so much for joining us at the Frilly and Funkie Challenge Blog!
Hugs,
Nancy
Hi Kezzy, This is WOW WOW stunning!! I think that Blue was a really happy mistake as it looks amazing! I love seeing you do projects like this!!.
Love Amanda xx
Now that's what I call a happy accident! The blue crackle has such a depth and beautiful antique look - I think it takes this card onto another level - absolutely gorgeous! Love the story of how your creative journey had to change direction - and the fabulous re-colouring of that wonderful background to link it in... It all works so beautifully in the end. Fantastic post!
Alison xx
stunning work Kerry - I love the blue - maybe I'm a bit odd but I do - i think its beautiful! The whole piece is fabulous - thanks for all the details and the step by step - brilliant xx
lovely dies on this fab fathers day card, thank you for entering our challenge at Crafty catz and hope to see you again
Tilly
Fantastic card, super details and texture and a great step by step. Thank you for joining us at TioT's this time.
Yvonne
One word, WOW!!!!! Thanks for joining us at TIOT this week, Valerie
A brilliant card and a super tutorial, thank you for joining the TIOT challenge hugs Bee
This is such a lovely Father's Day card, love the colors and this fab image, and thank you for the 'step by step' tutorial, it is priceless. Thank you for joining our challenge at Crafty Catz and we will be glad seeing you again.
Hugs,
Anna xxx
Wow! Amazing card and the thank you for the detailed tutorial! Ingrid, the GDT for Crafty Catz xx
Oh wow! You really had to work hard to get this finished and my goodness the end justifies that process. Love the mix of textures and that glorious green-blue colouring. Love it to bits. Thanks for joining us at Frilly and Funkie. Jenny x
Lovely Masculine card, and a wonderful tutorial Thanks for joining us at Ooh La La Creations Alli x
Gorgeous card, love all the techniques ! Thanks for joining us at CVC. Sue C x
Wow What a stunning card.I like it a lot.
Greetings
Felicie
This is wonderful and I like your colour scheme even if it was an accident. I love all the techniques you have done and appreciate you sharing how you did them. Thanks for joining us at Frilly and Funkie.
Hugs!
Cec
Fantastic card! All the elements, distressing and wonderful crackle go so well together. Thank you so much for sharing with us at Simon Says Stamp Monday Challenge Blog!
Wonderful card! It has such fun "metal" elements. A wonderful creation! Thank you for sharing your work with us at the Simon Says Stamp Monday Challenge. ~Michelle
Wow wow wow- What a fantastic masculine card- a great work!!!"!
Post a Comment